 Skip to content
 Clear coat failure catches most drivers off guard. One month your paint looks fine. The next, the hood starts fading, or the roof begins to peel in thin, chalky sheets. That glossy finish you paid for slowly turns dull and rough.
As an ASE-certified automotive professional with more than two decades in the shop, I’ve repaired everything from minor oxidation to full panel refinishing jobs. At AHS Rankers, I evaluate repair quality daily, and clear coat damage is one of the most misunderstood issues drivers face.
If you’re researching how to repair auto clear coat, you’re likely trying to avoid expensive repainting while protecting your vehicle’s value. Let’s break down what’s really happening and what your options are.
What Is Clear Coat,and Why It Fails Over Time
Clear coat isn’t cosmetic fluff. It’s the protective barrier that seals your vehicle’s color layer from UV rays, moisture, road salt, and contaminants. When it fails, the base coat underneath becomes vulnerable.
Most clear coat damage doesn’t happen overnight. It’s gradual. Sun exposure, automatic car washes, improper buffing, and skipped maintenance all accelerate breakdown. What this really means for drivers is simple: once peeling starts, it rarely stops on its own.
Understanding the early warning signs helps you decide whether you can repair the damage, or whether refinishing is the smarter long-term move.
Also Read: How To Repair Peeling Auto Paint?
Common Signs Your Clear Coat Needs Repair
Clear coat failure usually shows up first on horizontal surfaces. The hood, roof, and trunk take the most sun exposure, so they degrade faster than doors or quarter panels.
You might notice cloudy patches that don’t polish out. That haze is oxidation breaking through the protective layer. If you run your hand across the surface and it feels rough or chalky, that’s another red flag.
Peeling often begins along panel edges or near windshield trim. It starts small, then spreads. Once you see lifting or flaking, the protective seal has already failed.
Another indicator? Fading that looks uneven compared to the rest of the car. That usually means the clear coat has thinned or separated from the base coat. At that stage, wax won’t fix it.
How To Repair Auto Clear Coat Properly (Step-by-Step)

Clear coat repair isn’t complicated, but it is precise. Rushing the prep or skipping steps almost guarantees visible lines, uneven gloss, or early failure. I’ve seen plenty of DIY attempts that looked good for two weeks, then started peeling again.
If you want lasting results, the process matters more than the product brand. Let’s break it down clearly and practically.
Step 1 – Clean and Degrease The Surface
Any repair starts with surface prep. Dirt, wax, silicone residue, and road grime prevent new clear coat from bonding correctly.
Wash the panel thoroughly with automotive soap. Dry it completely. After that, wipe the repair area with a proper wax and grease remover. Don’t substitute household cleaners. They leave residue.
I’ve inspected repairs where contamination caused fisheyes in the finish. Those small crater-like defects almost always trace back to poor cleaning. If the surface isn’t surgically clean, adhesion suffers.
Take your time here. Prep determines durability.
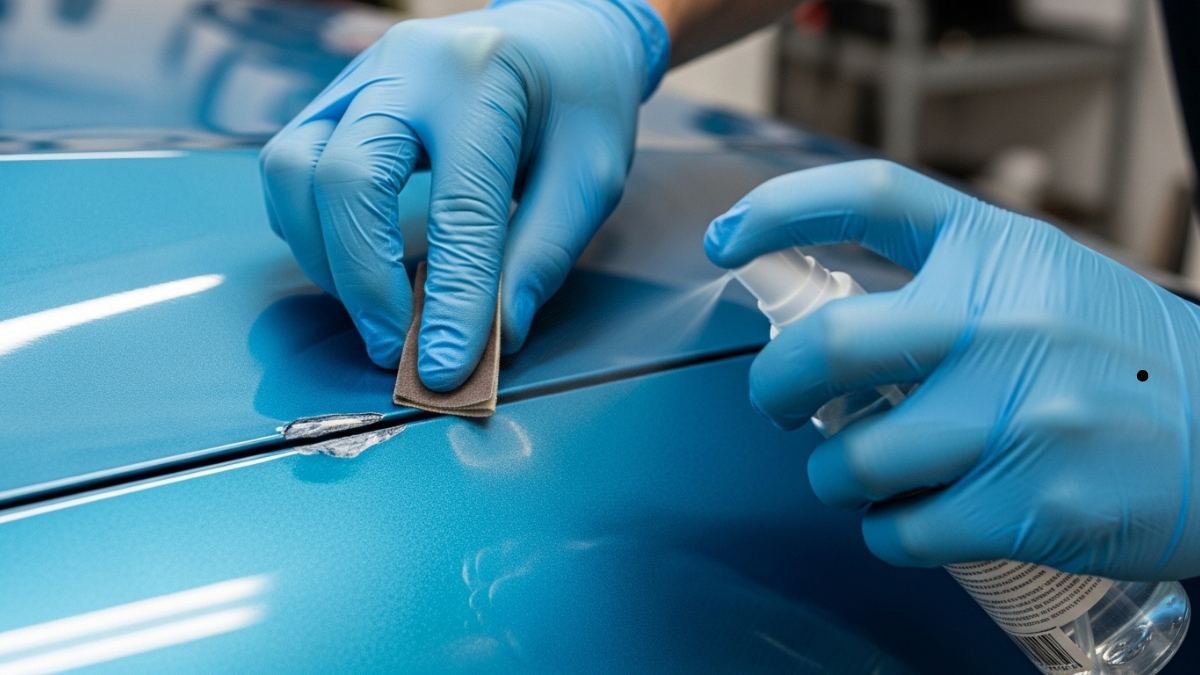
Step 2 – Sand The Damaged Area Carefully
Sanding removes failed clear coat and feathers the edges so the new layer blends smoothly. The goal isn’t to strip to bare metal. You’re leveling the damaged clear coat without cutting through the base color.
Start with 600- or 800-grit sandpaper for peeling areas. If you’re dealing with light oxidation, 1000- to 1500-grit may be enough. Keep the surface wet to prevent deep scratches.
Feather the edges gradually. You shouldn’t feel a sharp ridge between old and new surfaces. If you burn through the base coat, the repair becomes more complex and may require repainting.
Patience here separates clean repairs from patchy ones.
Step 3 – Mask Surrounding Panels
Overspray travels farther than most drivers expect. Even a controlled spray can lightly dust adjacent panels.
Mask off trim, glass, headlights, and nearby paint with automotive tape and plastic sheeting. Avoid newspaper. Ink can transfer if moisture is present.
Professional body shops use controlled spray environments for a reason. In a driveway setting, protection matters even more. Dust, wind, and humidity all affect finish quality.
What this really means for drivers is that setup takes longer than spraying — and that’s normal.
Step 4 – Apply Clear Coat in Thin, Even Layers
Application technique makes or breaks the repair. Shake the can thoroughly if you’re using an aerosol clear coat. Hold it about 6–8 inches from the surface.
Apply light, even passes. Don’t try to achieve full gloss in one coat. Two to three thin layers provide better leveling and reduce the risk of runs.
Allow proper flash time between coats, following manufacturer instructions. Rushing this step traps solvents and weakens durability.
I’ve corrected many sagging clear coat jobs where the applicator sprayed too heavy, too fast. Thin layers cure stronger and look smoother long term.
Step 5 – Wet Sand and Polish After Curing
Clear coat needs time to cure fully. Depending on the product, that could be 24–48 hours or longer.
After curing, wet sand lightly with 1500- to 2000-grit paper to level minor texture or orange peel. Keep pressure light and consistent.
Follow up with polishing compound using a dual-action polisher or careful hand buffing. The goal is to restore uniform gloss and blend the repair into surrounding paint.
From decades in automotive refinishing environments, I can tell you this stage transforms the final look. Done correctly, the repair should look intentional — not patched.
Also Read: How To Fix Auto Rust Spots?
Common Mistakes That Ruin Clear Coat Repairs
Many clear coat repairs fail because of preventable errors. I see the same patterns repeatedly during shop inspections.
Here are the most common issues:
- Spraying in high humidity or direct sunlight
- Skipping sanding steps
- Applying thick coats that run or sag
- Not allowing proper curing time
- Failing to feather edges properly
Clear coat repair isn’t about shortcuts. Precision and patience matter more than speed.
DIY Clear Coat Repair Vs. Professional Refinishing
Clear coat repair sits in a gray area between cosmetic touch-up and full refinishing. Some damage can be stabilized at home. Other cases demand professional equipment and controlled spray conditions.
I’ve evaluated hundreds of body shops, and the difference usually comes down to scale and blending. Small oxidation spots? That’s one conversation. Large peeling across multiple panels? That’s another.
Let’s break down where DIY makes sense, and where it often falls short.
When DIY Clear Coat Repair Makes Sense
DIY repair works best when the damage is minor and contained. A small patch on the hood or a lightly oxidized roof section can often be restored without repainting the entire panel.
You also need realistic expectations. A driveway repair can improve appearance and slow further peeling, but it rarely matches factory finish perfectly. If you plan to keep the car several more years and want protection without major expense, this route can be reasonable.
Short-term resale prep is another common scenario. Stabilizing peeling before listing a vehicle can improve presentation. Just understand the repair may not be permanent.
Precision, patience, and clean prep determine whether it holds up.
When You Should Consider A Professional Auto Body Shop
Large peeling sections, widespread oxidation, or exposed base coat change the equation. At that point, blending becomes critical.
Professional shops operate in controlled environments with proper spray booths and curing systems. That stability reduces dust contamination and improves adhesion. Many reputable facilities employ ASE-certified auto body technicians, which signals verified technical training.
Metallic and pearl finishes especially require skill. Color matching and clear blending across panels prevent visible transition lines.
If your vehicle still carries strong resale value, or you want long-term durability, refinishing the panel properly is often the smarter financial decision. A rushed repair that fails in a year can cost more the second time around.
How Much Does Clear Coat Repair Cost?

Cost varies widely depending on damage severity and whether repainting is required. A small isolated repair differs greatly from refinishing an entire hood.
DIY materials typically range from moderate to affordable. Professional repairs depend on labor rates, paint systems, and blending requirements.
Here’s what influences pricing most.
- Extent of peeling or oxidation
- Type of paint (solid, metallic, pearl)
- Panel size and blending complexity
- Local labor rates
- Shop certifications and warranty coverage
Minor spot repairs may cost significantly less than full panel refinishing. However, partial repairs that fail later can double overall expense.
Choosing based on durability rather than just upfront price often saves money long term.
Also Read: How To Repair Auto Paint Scratches?
How To Prevent Clear Coat Failure In The Future
Prevention costs far less than repainting. Clear coat degrades fastest under UV exposure and abrasive washing methods.
Routine maintenance protects the surface and extends life. You don’t need elaborate detailing routines — just consistent care.
Here’s what matters most.
- Wash every two to three weeks with pH-neutral soap
- Avoid automatic brush car washes
- Apply wax or sealant quarterly
- Park in shaded or covered areas when possible
- Address chips and scratches early
These habits reduce oxidation and slow breakdown. Paint protection isn’t complicated. It’s consistency.
Final Thoughts
Clear coat damage often looks worse than it is. With accurate information, you can decide whether a careful DIY repair makes sense or whether professional refinishing offers better long-term value.
At AHS Rankers, I focus on evaluating real trust signals, technician credentials, workmanship quality, warranty strength, and verified customer feedback, not paid placements. That same practical lens applies here. Clear coat repair isn’t about hype products or shortcuts. It’s about process, preparation, and realistic expectations.
When you understand the repair path clearly, the decision becomes straightforward. And that clarity reduces both cost and stress.


Add your first comment to this post